Getting Started
Introduction
Vue.js is a library for building interactive web interfaces.
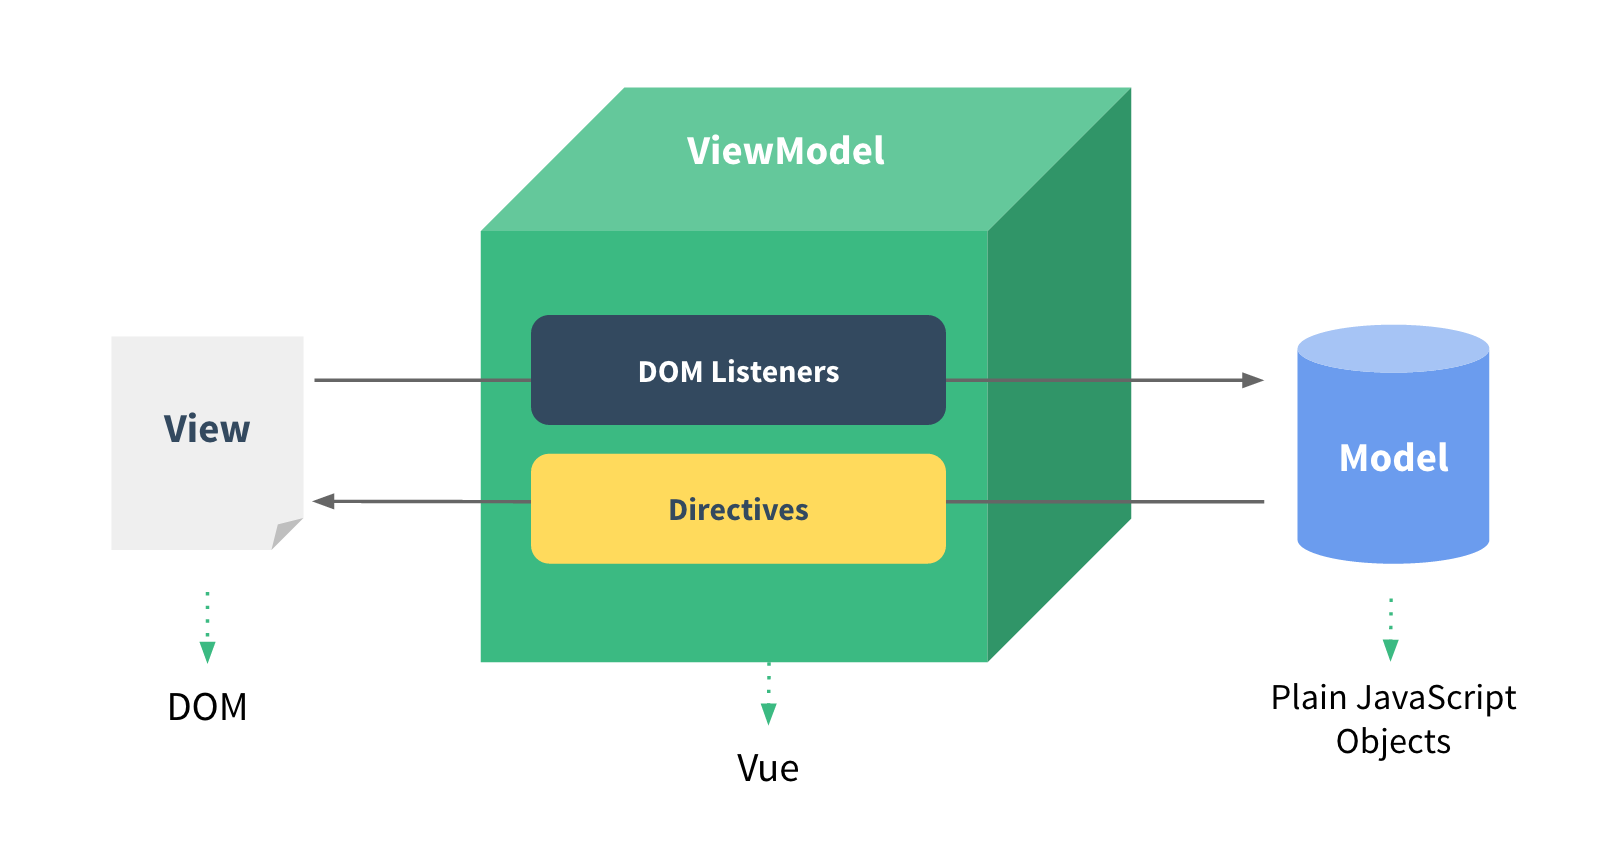
Technically, Vue.js is focused on the ViewModel layer of the MVVM pattern. It connects the View and the Model via two way data bindings. Actual DOM manipulations and output formatting are abstracted away into Directives and Filters.
Philosophically, the goal is to provide the benefits of reactive data binding and composable view components with an API that is as simple as possible. It is not a full-blown framework - it is designed to be a view layer that is simple and flexible. You can use it alone for rapid prototyping, or mix and match with other libraries for a custom front-end stack. It’s also a natural fit for no-backend services such as Firebase.
Vue.js’ API is heavily influenced by AngularJS, KnockoutJS, Ractive.js and Rivets.js. Despite the similarities, I believe Vue.js offers a valuable alternative to these existing libraries by finding a sweetspot between simplicity and functionality.
Even if you are already familiar with some of these terms, it is recommended that you go through the following concepts overview because your notion of these terms might be different from what they mean in the Vue.js context.
Concepts Overview
ViewModel
An object that syncs the Model and the View. In Vue.js, every Vue instance is a ViewModel. They are instantiated with the Vue constructor or its sub-classes:
1 | var vm = new Vue({ /* options */ }) |
This is the primary object that you will be interacting with as a developer when using Vue.js. For more details see The Vue Constructor.
View
The actual DOM that is managed by Vue instances.
1 | vm.$el // The View |
Vue.js uses DOM-based templating. Each Vue instance is associated with a corresponding DOM element. When a Vue instance is created, it recursively walks all child nodes of its root element while setting up the necessary data bindings. After the View is compiled, it becomes reactive to data changes.
When using Vue.js, you rarely have to touch the DOM yourself except in custom directives (explained later). View updates will be automatically triggered when the data changes. These view updates are highly granular with the precision down to a textNode. They are also batched and executed asynchronously for greater performance.
Model
A slightly modified plain JavaScript object.
1 | vm.$data // The Model |
In Vue.js, models are simply plain JavaScript objects, or data objects. Once an object is used as data inside a Vue instance, it becomes reactive. You can manipulate their properties and Vue instances that are observing them will be notified of the changes. Vue.js achieves transparent reactivity by converting the properties on data objects into ES5 getter/setters. There’s no need for dirty checking, nor do you have to explicitly signal Vue to update the View. Whenever the data changes, the View is updated on the next frame.
Vue instances proxy all properties on data objects they observe. So once an object { a: 1 } has been observed, both vm.$data.a and vm.a will return the same value, and setting vm.a = 2 will modify vm.$data.
The data objects are mutated in place, so modifying it by reference has the same effects as modifying vm.$data. This makes it possible for multiple Vue instances to observe the same piece of data. In larger applications it is also recommended to treat Vue instances as pure views, and externalize the data manipulation logic into a more discrete store layer.
One caveat here is that once the observation has been initiated, Vue.js will not be able to detect newly added or deleted properties. To get around that, observed objects are augmented with $add, $set and $delete methods.
Below is a high-level overview of how reactive updates are implemented in Vue.js:

Directives
Prefixed HTML attributes that tell Vue.js to do something about a DOM element.
1 | <div v-text="message"></div> |
Here the div element has a v-text directive with the value message. This tells Vue.js to keep the div’s textContent in sync with the Vue instance’s message property.
Directives can encapsulate arbitrary DOM manipulations. For example v-attr manipulates an element’s attributes, v-repeat clones an element based on an Array, v-on attaches event listeners… we will cover them later.
Mustache Bindings
You can also use mustache-style bindings, both in text and in attributes. They are translated into v-text and v-attr directives under the hood. For example:
1 | <div id="person-{{id}}">Hello {{name}}!</div> |
Although it is convenient, there are a few things you need to be aware of:
The src attribute on an <image> element makes an HTTP request when a value is set, so when the template is first parsed it will result in a 404. In this case v-attr is preferred.
Internet Explorer will remove invalid inline style attributes when parsing HTML, so always use v-style when binding inline CSS if you want to support IE.
You can use triple mustaches for unescaped HTML, which translates to v-html internally:
1 | {{{ safeHTMLString }}} |
However, this can open up windows for potential XSS attacks, therefore it is suggested that you only use triple mustaches when you are absolutely sure about the security of the data source, or pipe it through a custom filter that sanitizes untrusted HTML.
Finally, you can add * to your mustache bindings to indicate a one-time only interpolation, which does not react to data changes:
1 | {{* onlyOnce }} |
Filters
Filters are functions used to process the raw values before updating the View. They are denoted by a “pipe” inside directives or bindings:
1 | <div>{{message | capitalize}}</div> |
Now before the div’s textContent is updated, the message value will first be passed through the capitalize function. For more details see Filters in Depth.
Components

In Vue.js, every component is simply a Vue instance. Components form a nested tree-like hierarchy that represents your application interface. They can be instantiated by a custom constructor returned from Vue.extend, but a more declarative approach is registering them with Vue.component(id, constructor). Once registered, they can be declaratively nested in other Vue instance’s templates in the form of custom elements:
1 | <my-component> |
This simple mechanism enables declarative reuse and composition of Vue instances in a fashion similar to Web Components, without the need for latest browsers or heavy polyfills. By breaking an application into smaller components, the result is a highly decoupled and maintainable codebase. For more details, see Component System.
A Quick Example
1 | <div id="demo"> |
1 | var demo = new Vue({ |
Result
{{title | uppercase}}
- {{content}}
Also available on jsfiddle.
You can click on a todo to toggle it, or you can open your Browser’s console and play with the demo object - for example, change demo.title, push a new object into demo.todos, or toggle a todo’s done state.
You probably have a few questions in mind now - don’t worry, we’ll cover them soon.
Next up: Directives in Depth.